A Beginner’s Guide — With Megan Joy Creasy of Nutmegs Bread & Bakery
Starting a micro home bakery can feel equal parts exciting and overwhelming. You might have the passion, the recipes, and the dream — but still find yourself wondering where to begin, what you actually need, or whether you’re “ready enough.”
Over the past year, I’ve had bakers — especially younger moms reach out asking the same question:
“How do I start a micro bakery from home?”
So instead of answering that question alone, I wanted to build something more meaningful — a true beginner-friendly guide created alongside someone who has walked this path herself.
This post is a collaboration with Megan Joy Creasy, owner of Nutmegs Bread & Bakery, who generously shared her real experiences, fears, lessons, and growth. The kind of insight that actually helps new bakers move forward with confidence.

Photo courtesy of Megan Joy Creasy, Nutmeg’s Bread & Bakery
We’ve woven her lived experience into a practical step-by-step guide designed to help you start a home bakery business, understand legal requirements, build confidence, and avoid the most common beginner mistakes.
Whether you want to sell sourdough, cookies, pastries, or simply test the waters of selling baked goods from home, this guide is here to give you clarity, encouragement, and realistic next steps.
You don’t need a commercial kitchen.
You don’t need a huge following.
You don’t need perfection.
You just need a starting point — and that’s exactly what this is.
Who This Guide Is For
This guide is for you if you are:
- A beginner wondering how to start a home bakery
- A mom wanting to stay home while earning income
- Someone craving flexible, creative side income
- A baker who loves sourdough, cookies, or pastries but doesn’t know how to sell legally
- Feeling excited… and also terrified
Quote from Megan – “I honestly think so many people could thrive in this job, but I think that it can be a perfect fit for the mom that wants to stay home and make some income. It’s hard work already and having kids around can make it more difficult, but it can be done. You also have complete control over how much you do and try to make it work for your life. I do think though that this is the absolute perfect job for someone who doesn’t have kids yet and wants to be home. It can also be a great job to build from the ground up before you have children in anticipation of having kids and wanting to stay home.”

Photo courtesy of Megan Joy Creasy, Nutmeg’s Bread & Bakery
Before You Start — The Legal Piece (Important)
Before selling any baked goods from home, you need to check your state’s Cottage Food Law. This tells you what you are legally allowed to sell and whether you need a permit or label requirements.
In most states, cottage food rules are fairly simple but important. Many require a short food-safety course or certification, basic labeling on your packaging (such as your name, address, ingredients, and allergen information), and limits on what types of foods you can sell. Some states also have annual sales caps or require a small registration fee. The exact rules vary, but preparing ahead by knowing your local guidelines will save you stress and help you start with confidence.
Quick Action Steps
- Search: “Your State + Cottage Food Law”
- Look for permit, labeling, or inspection rules
- Join a local baker Facebook group for clarity
Helpful Note:
You can scroll to the bottom of this guide for a full list of every state’s official link that will take you directly to their cottage food license information.
Megan – What almost stopped you from starting? “The unknown! It’s so scary doing something new and not knowing if it’s going to work in the end. Not many people like failure, right? But something I’ve learned is that something not working out like we had planned can teach us going forward. You also never know if it’s going to actually work if you don’t try.”
Megan – Did you feel “ready” when you started—or did you learn as you went? “Maybe a little of both! There were aspects I felt ready in, but looking back, I really have learned SO much and I’ve also become so much better. Everything looks better. I’m far from perfect, but I think the whole “practice makes perfect” saying is true.”
Step 1 — Start With the Kitchen You Already Have
You do not need a commercial setup. Most micro bakeries begin with everyday tools.
No massive upgrades. No debt. Just using what was already in her cupboards.
Beginner Supplies Checklist
- Oven you already own
- Baking sheets
- Dutch oven (for sourdough)
- Mixing bowls
- Basic packaging (boxes or bags)
- Parchment paper
Upgrade later — after income begins.
Quote from Megan – “Before I really became an official home bakery, I started to sell a loaf of sourdough or other baked goods very sporadically in 2021 at my former house. I just used what I had. A Dutch oven, baking sheets, small KitchenAid, etc. I ended up getting too anxious to continue because I wanted to make sure I was doing everything legally with the Cottage Food Law in my state and stopped for a time.“
Megan – What do beginners worry about that actually matters the least? “What people they know will think of them. Majority of the time, people don’t think about us nearly as much as we think that they do. If someone in your life snarls their nose as you wanting to start a business, that confuses me. Surround yourself with at least a couple of people who can cheer you on and encourage you in the hard days.”

Photo courtesy of Megan Joy Creasy, Nutmeg’s Bread & Bakery
Step 2 — Test Your Capacity Before Taking Orders
Instead of opening pre-orders right away, consider running a trial bake first. This allows you to test your recipes, timing, and overall workload without the pressure of fulfilling paid orders. You’ll get a realistic sense of how many items you can comfortably produce in one day, how long each step truly takes, and whether your process feels sustainable. A trial bake also gives you finished products to photograph, sample, or offer as limited “available now” items, helping you build confidence before committing to customer deadlines.
Action Steps
- Choose 1–2 menu items
- Bake the maximum you think you can handle
- Post what’s available after baking
- Track how long it took and how you felt
Megan – How can beginners test what works without stressing themselves out? “I really encourage everyone to do a bake that isn’t pre-ordered and bake as much as you think you can handle and then post the baked goods that are available. This takes the pressure off of you needing to fulfill orders and hoping they come out well and also allows you to get a good taste of what is a sustainable amount for you to handle. Then going forward, only offer those amounts that you discovered worked for you. Just because you *can* make more doesn’t mean that you should. You don’t want to burn out.”

Photo courtesy of Megan Joy Creasy, Nutmeg’s Bread & Bakery
Step 3 — Choose a Small, Strong Menu
Many beginners delay starting because they believe they need a giant menu. You don’t.
When you’re first starting a home bakery, it’s best to keep your menu small and focused. Offering just a few items allows you to perfect your recipes, manage your time better, and avoid feeling overwhelmed by too many ingredients or prep steps. A smaller menu also helps customers quickly understand what you specialize in, which builds trust and consistency. You can always expand later, but starting simple makes the process more sustainable and far less stressful.
Megan – If you were starting over today, what would you sell first? “I honestly think it might be cinnamon rolls or pepperoni rolls. If I were the baker back then that I am today. They do SO well.”
Megan – How did you decide what to bake at the beginning? “I’ve loved recipe development since I was a little girl. I already had a couple of recipes up my sleeve for cookies and cinnamon roll and of course sourdough was a given. I decided to offer my cookies as cookie sandwiches as well and those are a big hit. I just wanted to offer a few really solid items rather than a billion that might be subpar or too overwhelming to keep up with.”
Megan – Why is less often more when you’re starting a micro bakery? “I think for me I would say that it’s because “more” often makes us overthink, over exert, and overwhelm. I think it can quickly keep someone from starting if they think they can’t start until they have 15 menu items, obtaining ALL the ingredients for those 15 menu items, have the funds to order a lot of baking equipment a part from what they already own, get a huge mixer, get the big oven, etc. There is SO much you can do with what most people already own. I can’t imagine if that had been my thought process when I started. I started my bakery with under $300 and the rest I used what I had. I used that money for a few extra bannetons, ingredients, and packaging. The rest came along the way as people supported me or as I saved to invest back into my business over time.”

Step 4 — Price for Sustainability, Not Comfort
Pricing causes anxiety for almost every new baker.
When it comes to pricing, many new bakers feel nervous charging what their goods are truly worth, but setting fair prices from the beginning is essential for sustainability. Your pricing should cover ingredients, packaging, utilities, and your time — not just the cost of flour and sugar. Remember that homemade baked goods are a premium, handcrafted product, and the right customers will value quality and effort. Charging appropriately allows your bakery to grow without burnout and ensures you’re building a business, not just a hobby.
A Simple Pricing Recipe for Home Bakers
Step 1 — Add Up Your Ingredients
Calculate the exact cost of everything used in one batch (flour, sugar, butter, yeast, fillings, etc.). Then divide by how many items the batch makes.
Step 2 — Add Packaging Costs
Include boxes, bags, labels, parchment, stickers — anything the customer receives with the product.
Step 3 — Pay Yourself for Time
Decide on an hourly rate (even $15–$25/hour to start). Track how long the bake takes and add that cost to the batch total.
Step 4 — Include Utilities & Overhead
Estimate a small amount for electricity, water, and equipment wear — even $1–$3 per batch adds up accurately over time.
Step 5 — Add a Profit Margin
Once costs are covered, add 10–30% so your business can grow, replace tools, and stay sustainable.
Step 6 — Compare Local Prices
Check what other cottage bakers in your area charge to ensure you’re within a realistic range.
Final Formula:
(Ingredients + Packaging + Time + Overhead) ÷ Number of Items = Base Price per Item
Then add your profit margin.
This keeps pricing fair, consistent, and prevents burnout — you’re building a business, not just covering groceries.
Quote from Megan – “Oh goodness! This gave me so much anxiety when I started! When a family friend had tried some of my cookies that December before becoming official, they asked if they could purchase a dozen. I didn’t even know what my prices needed to be. I told her I’d get back to her. After my husband and I broke down how much it cost to actually make them, looked at packaging, and considered my time, I was nervous to name the price. However, she was totally fine with it! When I did become official and priced my other baked goods I was genuinely nervous that people wouldn’t order because of it. I use organic and/or non gmo ingredients so it just makes the difference with pricing. But I knew that if I were going to make this business work and be sustainable, they were the prices I had to have. The right customers would come. And they did.”
Megan – What would you say to a baker who feels bad charging “that much”? – “You yourself are not your customer. Stop imposing thoughts on what you might think about someone charging that and instead think of all of the possible customers who don’t give those prices a second thought for local, homemade baked goods.”

Photo courtesy of Megan Joy Creasy, Nutmeg’s Bread & Bakery
Step 5 — Create a Simple Weekly Baking Schedule
A micro bakery should support your life — not consume it.
This simple three-day flow works best when each day has a clear purpose. Try to group similar tasks together and prepare as much as you can in advance so you’re not constantly switching between steps. On prep and dough day, measuring ingredients and mixing batches back-to-back can save time and cleanup. Shaping day is ideal for focused, uninterrupted work, and bake day should mainly be for oven time, packaging, and customer pickups. Keeping each day structured but flexible helps reduce stress, prevent burnout, and creates a routine you can realistically maintain week after week. Flexibility is one of the biggest advantages of a home bakery.
Example Beginner Schedule
- Day 1: Prep & dough
- Day 2: Shaping & prep
- Day 3: Bake & pickup
Megan – What does a “realistic” baking schedule look like for beginners?– “I think this will all depend on one’s capacity. If someone is still working another job, that will look totally different from the young adult who still lives at home and doesn’t have children. A couple of prep days and one bake and pick up day. My pick up time frame is 3-6pm or I leave the rest of the baked goods on the porch table for after hours pick up.”

Photo courtesy of Megan Joy Creasy, Nutmeg’s Bread & Bakery
Step 6 — Get Your First Customers Through Visibility
You don’t need to go viral. You need consistency and places where people can find you.
Action Steps
- Create a Facebook or Instagram bakery page
- Pin your menu and prices
- Post 2–3 times per week
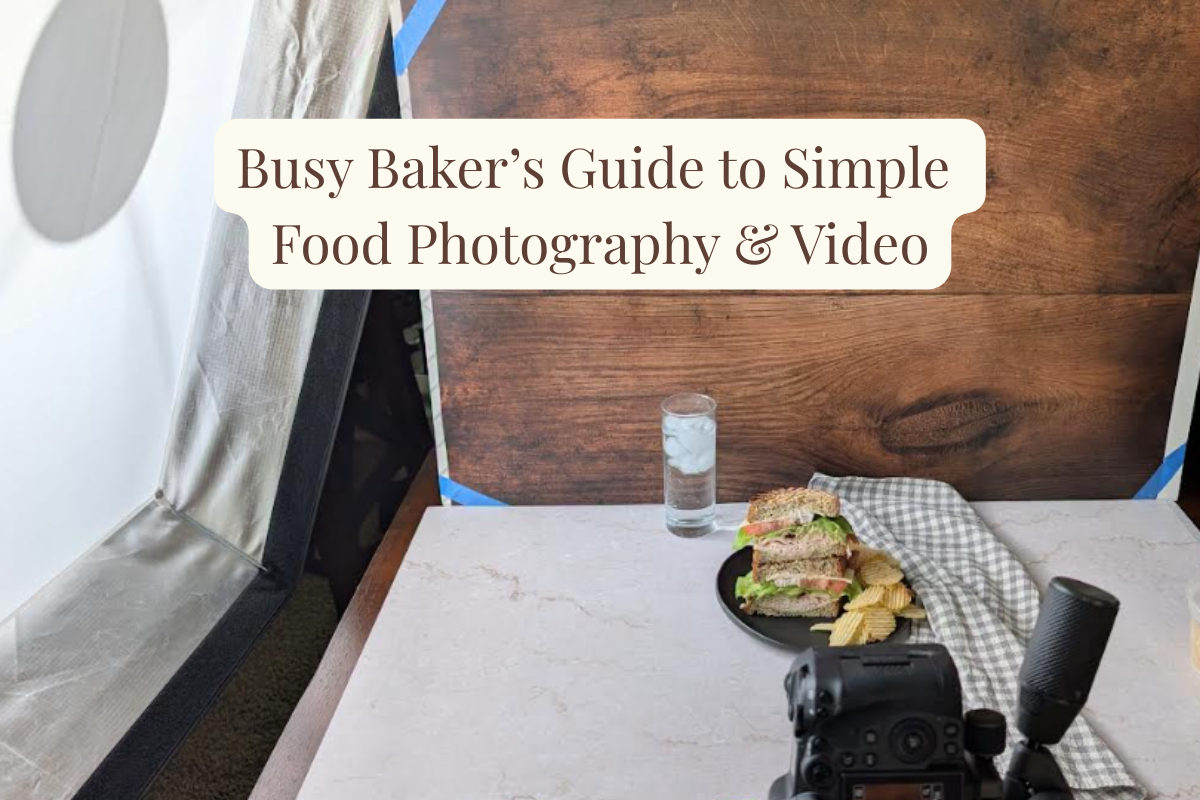
- Take bright, natural-light photos-check out our blog post ->Busy Baker’s Guide to Simple Food Photography & Video
- Ask friends and family to share
- Create a free listing on the Micro Bakery Directory so local customers can discover you
Quote from Megan – “I personally think it’s important especially today to have social media to advertise. Even if you don’t become an influencer, it’s still so important for people to constantly see your feed. Post consistently, learn how to take pictures that make it look yummy, and keep sharing. Ask your friends and family to share your social media pages. Do a couple of giveaways of your band goods for those that like and share your post and tag someone.”
Megan – Who were your first customers—and how did you find them?– “Friends, family, and people who knew them from word of mouth. When I became official, I started a Facebook bakery page that had a couple thousand followers within just a couple of weeks. It was shocking and amazing! Even with that many followers though, I was averaging like 10-25 customers weekly, but selling out or almost selling out each time.”

Photo courtesy of Megan Joy Creasy, Nutmeg’s Bread & Bakery
Common Beginner Mistakes (So You Can Skip Them)
- Overloading the menu too early
- Underpricing out of guilt
- Saying yes to too many custom orders
- Ignoring legal requirements
- Packaging mistakes
Megan – What’s a mistake you made early on that you’re grateful for now?– “My trial run week I used a red tissue paper in my cookie and cinnamon roll boxes for Christmas. Bad idea. Baaaad idea. Who knew that tissue paper actually sucks out the moisture of baked goods? Thankfully, I had a friend reach out to let me know. Use parchment liners. It looks so much cleaner anyway.”
Megan – What advice would you give to bakers who compare themselves to everyone else online?– “I think comparison can be a thief. I think that it can quickly keep us inactive. I also think that it can do some good if we allow it to. Some comparison might be what we need to evaluate how we’re doing something and if we could change some things for the better. Maybe it’s how we realize we’re not advertising very well and just hoping the customers come. Maybe it’s not knowing enough on how to take pictures or videos of your baked goods knowing that people eat with their eyes first and realizing our goods don’t look that appetizing. But all in all, comparison can do damage. I do often encourage people to stop looking to the left and right and just keep looking forward.”
What Success Actually Looks Like
Success is not influencer fame. It’s sustainability.
Quote from Megan “Welcome to the beginners fear, my friend. You’re not alone. Almost any of us who have started have been where you are. The only difference between you and me is that I took the next step and then the next step and then the next step. It’s time for you to take yours. You really *can* do it.”
Megan – How do you know when something is good enough to sell?– “Well, first of all, my husband is my biggest taste tester and I absolutely trust his opinion. I also use other family and friends to try things out. Keeping in mind that everyone’s desire on taste and texture can differ. So I just bunch all of the info together and decide on possible changes. However, when I first started selling sourdough, looking back, my loaves were far from perfection and in the eyes of majority of sourdough bakers who have perfected the craft, would probably say I should have never been selling them. They were quite subpar loaves for quite some time. But, I still sold them and still have customers from back then purchasing a lot better baked goods now. I’m very thankful.”
Megan – Was there a point where you felt discouraged or stuck? What helped you push through?– “So many times! Like when my brand new home oven burned up with two different parts only three months after being in business and it took weeks and weeks to get fixed and then again a couple of months later having an issue with our water pipes and having a couple more weeks that I couldn’t work. There truly have been several times that I’m like, “Am I supposed to be doing this???” and then my husband helps bring me back to earth and I realize all over again that yes, I love what I do and there are hard times with just about any job.”

Photo courtesy of Megan Joy Creasy, Nutmeg’s Bread & Bakery
Baker Highlight
Megan Joy Creasy is the heart and hands behind Nutmeg’s Bread & Bakery, a cozy in-home micro bakery rooted in sourdough, creativity, and community. From her home kitchen, she crafts naturally leavened breads and sweet treats while inviting others into the real, behind-the-scenes moments of baking life. You can find her sharing her process, progress, and everyday bakery moments on Instagram @nutmegsbreadandbakery — a journey that beautifully reminds us big dreams can rise from small beginnings, one loaf at a time.
Megan – How has running a home bakery changed you personally?– “Believing that God is the one who made me the way that I am. He created me to be creative. He gave me the entrepreneurial mind that I have. Since I was a little girl, I’ve felt so stupid. Not feeling really great at anything. I wasn’t great academically. I just had a mind full of possible businesses to create one day. Many things over the years have started to change my way of thinking about myself. One was when I started working for myself in salon renting a booth instead of having a manager. It was so scary, but I was so proud of myself and it was the best decision at that time. So choosing to actually start a business that I wanted to and loved for so long once again showed me that being who I am and having all these ideas because of the way God created my mind wasn’t so stupid after all.”

Photo courtesy of Megan Joy Creasy, Nutmeg’s Bread & Bakery
Final Encouragement — Your Next Step
Megan – What’s one small action that can lead to that first sale?– “Be excited, personable, and professional on your social media page/pages. Take photos that make your goods look desired. If you’re taking orders personally instead of using a pre-order site, make sure to pin your menu and price list so people aren’t guessing or not inquiring because they don’t want to be that person that ends up not ordering after they ask. Take the guess work out for your possible customers. Make sure they know how to order and what it’s all about.”
A final word from Megan –
“If this is what you’re supposed to be doing, God will lead you every step of the way. Doors will open. Customers will come. You just need to take a step of faith forward. Who knows where it will lead? You’ll never know until you take that next step. Just one. And then another one. And then another one.”
Here is your tiny next step:
Bake one item this week. Just one.
Momentum matters more than perfection.
Starting a micro bakery doesn’t begin with perfection.
It begins with courage… and the willingness to try.
A huge thank you to Megan for so generously sharing her story and insights with us. And to every baker reading this — Megan and I are both cheering you on. If there’s ever a topic we didn’t cover or something you need help with, please reach out. We truly want to be a source of support and encouragement as you start and grow your journey.
-h
Cottage Food Laws: U.S. States & Canadian Provinces
United States — Cottage Food Law Links
Alabama – https://www.aces.edu/blog/topics/cottage-food-law/
Alaska – https://dec.alaska.gov/eh/fss/homemade-food/
Arizona – https://www.azdhs.gov/preparedness/epidemiology-disease-control/food-safety-environmental-services/cottage-food-program/index.php
Arkansas – https://healthy.arkansas.gov/wp-content/uploads/Homemade_Food_Guide.pdf
California – https://www.cdph.ca.gov/Programs/CEH/DFDCS/Pages/FDBPrograms/FoodSafetyProgram/CottageFoodOperations.aspx
Colorado – https://cdphe.colorado.gov/dehs/cottage-foods
Connecticut – https://portal.ct.gov/dcp/food-and-standards-division/cottage-food/cottage-food-home
Delaware – https://www.dhss.delaware.gov/dph/hsp/ofpcfe.html
Florida – https://www.fdacs.gov/Business-Services/Food/Food-Establishments/Cottage-Foods
Georgia – https://agr.georgia.gov/cottage-food
Hawaii – https://health.hawaii.gov/san/files/2019/09/HMF-HANDOUT.pdf
Idaho – https://idahopublichealth.com/environmental/foodprotection/Cottage_Foods_FAQ.pdf
Illinois – https://dph.illinois.gov/topics-services/food-safety/cottage-food.html
Indiana – https://www.in.gov/health/food-protection/files/Home-Based-Vendors-FAQ-FINAL.pdf
Iowa – https://dial.iowa.gov/licenses/food-establishments-hotels/cottage-food-law
Kansas – https://www.agriculture.ks.gov/divisions-programs/food-safety-and-lodging/faq-food-safety
Kentucky – https://www.chfs.ky.gov/agencies/dph/dphps/fsb/Pages/homebasedprocessing.aspx
Louisiana – https://legis.la.gov/legis/Law.aspx?d=98431
Maine – https://www.maine.gov/dacf/qar/permits_and_licenses/documents/home-license-101.pdf
Maryland – https://health.maryland.gov/phpa/OEHFP/OFPCHS/Pages/Cottagefoods.aspx
Massachusetts – https://www.mass.gov/info-details/residential-kitchen-questions-and-answers
Michigan – https://www.michigan.gov/mdard/food-dairy/michigan-cottage-foods-information
Minnesota – https://www.mda.state.mn.us/food-feed/cottage-food-law-guidance
Mississippi – https://msdh.ms.gov/page/resources/5375.pdf
Missouri – https://health.mo.gov/safety/foodsafety/pdf/home-based-kitchen-food-prod-guidance.pdf
Montana –https://dphhs.mt.gov/publichealth/FCS/CottageFood
Nebraska – https://nda.nebraska.gov/fscp/foods/cottagefood.html
Nevada – https://dpbh.nv.gov/Reg/Cottage/Cottage_Food_Registration_-_Home/
New Hampshire – https://www.dhhs.nh.gov/programs-services/environmental-health-and-you/food-protection/homestead-food-operations
New Jersey – https://www.nj.gov/health/cottagefood/
New Mexico – https://www.env.nm.gov/fod/Food_Program/HomeBasedFoodRegulations.html
New York – https://agriculture.ny.gov/food-safety/home-processing
North Carolina – https://www.ncagr.gov/divisions/food-drug-protection/food-program/fdpd-food-program-home-processor.htm
North Dakota – https://www.ndhealth.gov/ehs/food/CottageFoods.htm
Ohio – https://www.agri.ohio.gov/divisions/food-safety/cottage-food-webpage
Oklahoma – https://www.ok.gov/health/Protective_Health/Environmental/Consumer_Safety_Service/Cottage_Foods.html
Oregon – https://www.oregon.gov/oda/programs/foodsafe/Pages/Cottage-Food-Program.aspx
Pennsylvania – https://www.agriculture.pa.gov/Plants_Land_Water/StateFoodSafety/Pages/cottage_food.aspx
Rhode Island –https://health.ri.gov/licenses/food/cottagefood/
South Carolina – https://scdhec.gov/food-beverages/food-service/cottage-food-producers
South Dakota – https://doh.sd.gov/food-safety/cottage-food.aspx
Tennessee – https://www.tn.gov/agriculture/food-safety/cottage-food.html
Texas – https://www.dshs.texas.gov/foodestablishments/cottagefoods/
Utah – https://ag.utah.gov/fooderr/cottage-foods/
Vermont – https://www.healthvermont.gov/environment/food-safety/home-processing
Virginia – https://www.vdacs.virginia.gov/food-cottage-food.shtml
Washington – https://agr.wa.gov/departments/food-safety/food-safety-clean-inspections/cottage-food
West Virginia – https://oehs.wv.gov/food/Pages/cottage-food-exemptions.aspx
Wisconsin – https://datcp.wi.gov/Pages/Programs_Services/CottageFood.aspx
Wyoming – https://sos.wyo.gov/Rules/Docs/Title030/Docs/30-006.pdf
(Note: Some states group cottage food under general food safety; check your Dept of Health or Agriculture site if needed.)
Canada – Provincial Home Food Business Info
(Many provinces require home‑based food businesses to follow health department rules; low‑risk foods are often governed by specific guidelines.)
Alberta – https://www.alberta.ca/low-risk-home-prepared-foods.aspx
British Columbia – https://www.bclaws.gov.bc.ca/civix/document/id/bills/billsprevious/4th41st%3Am228-1
Manitoba – https://www.gov.mb.ca/health/publichealth/environmentalhealth/protection/home.html
New Brunswick – https://www2.gnb.ca/content/gnb/en/departments/elg/environment/content/food_safety.html
Newfoundland & Labrador – https://www.gov.nl.ca/hcs/files/publichealth-envhealth-home-based-food-industry.pdf
Nova Scotia – https://novascotia.ca/nse/ehs/foodsafety/
Ontario – https://www.ontario.ca/page/home-based-food-businesses
Prince Edward Island – https://www.princeedwardisland.ca/en/topic/food-safety
Quebec – https://www.quebec.ca/en/health/food-safety
Saskatchewan – https://www.saskatchewan.ca/government/news-and-media/2016/june/29/homebased-food-businesses
Northwest Territories – https://www.hss.gov.nt.ca/en/services/environmental-public-health-services
Nunavut – https://www.gov.nu.ca/health
Yukon – https://yukon.ca/en/health-and-wellness/food-safety